CloudfloorDNS Blog
12-14-2022 – Migrating your DNS away from Dyn
By: Eric McIntyre – CloudFloorDNS

Migrating your DNS away from Dyn
Migrating your DNS away from Dyn? We can help!
Dyn has long been the darling of Managed DNS services since their inception almost 20 years ago. Oracle had purchased their booming Managed DNS business in 2016 and not too long after that announced the closure and migration path to Oracle Cloud Infrastructure.
As you can guess, many folks simply did not want to migrate their DNS to Oracle Cloud and this triggered a mass exodus that has been going on since 2018. Oracle pushed the closure date a few times but set a hard and fast shutdown date of May 31, 2023. As we approach that date many more domains are moving off the Dyn platform and there isn’t much time left to leave or move to Oracle.
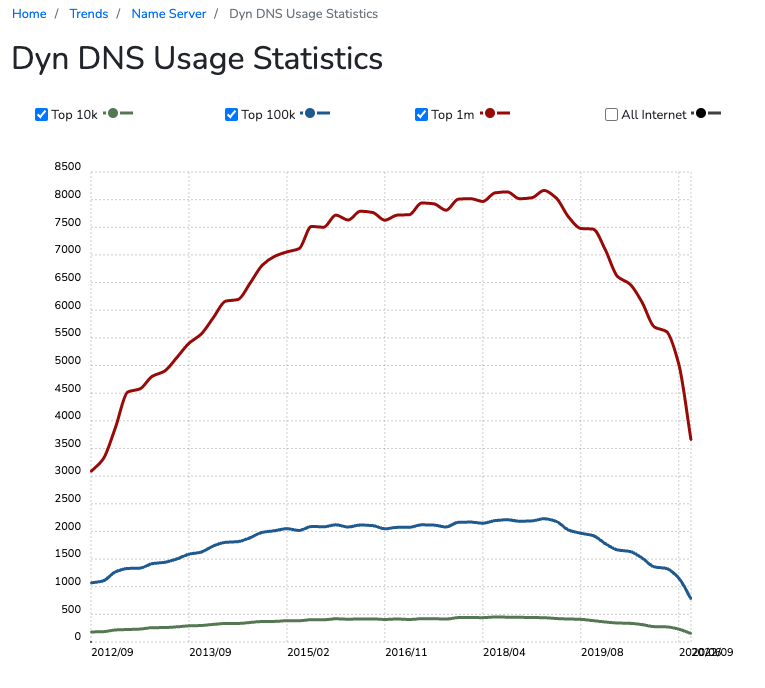
As you can see from the below graph on BuiltWith – this shows the exodus – some have moved to Oracle cloud, but many have selected other managed DNS providers such as CloudFloorDNS and others. Selecting your Managed DNS provider and where to migrate your DNS is probably one of the most important decisions you can make in regards to your digital business.
It’s not every day that we move DNS around from one provider to another, so getting some expert assistance is of high importance. When it comes to DNS, an outage on your primary domain or any domain in production can be catastrophic. One dot out of place or fat fingering could cause a serious outage and expensive downtime, so best to let the experts check your work and assist you in ensuring everything is setup properly before you flip the final switch.
When migrating your DNS away from Dyn, here’s a list of things to do to make your DNS migration go as smoothly as possible:
- Contact our DNS experts and get a quote
Our pricing at CloudFloorDNS is based on a few metrics similar to that of Dyn and other managed DNS providers. In order to provide an accurate price, our DNS experts need to understand what you have in your account at Dyn and what you are “consuming” for DNS queries. Typically this includes but is not limited to:- What is the total number of DNS zones or domains at Dyn?
- How many Queries Per Second you average over the past 3 months, 6 months?
- Do you use any advanced services such as GEO DNS, DNS Failover, Traffic Manager?
- Any extra support options such as a Gold support plan?
This above data will help CloudFloorDNS provide a custom quote if an online package isn’t available that suits your needs
- Gather all your domains with DNS hosted at Dyn, review where they are registered. This is where you make the final change and you must have these login details for each registrar to switch DNS providers. Put this info aside as you’ll need it near the end of this DNS migration process
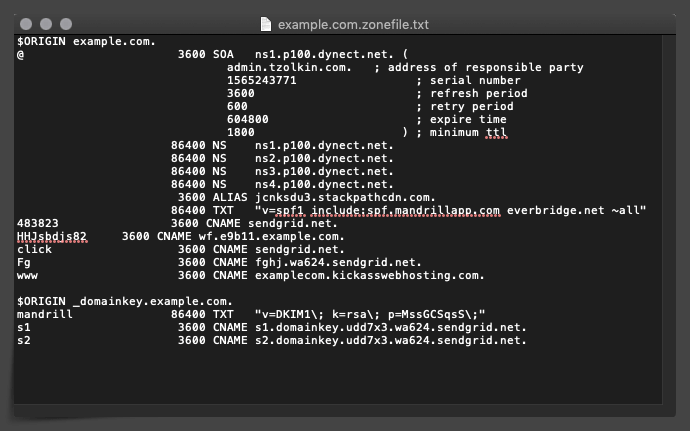
- Login to your Dynect portal and export all your DNS zone files to a BIND style zone (txt) file. Gather a list of your WebHop (web forwarding), any Alias Records you use (CNAME at Root) and if you have DNS failover, GEO DNS or other Dyn services, get screenshots and details about each. These details will help CloudFloorDNS migrate your DNS and replicate these services accurately during the setup staging process
An example of a Bind style zonefile exported from Dyn managed DNS
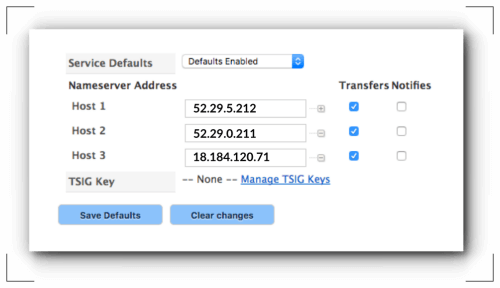
- Purchase a CloudFloorDNS service and at Dyn, add in the AXFR IP’s from CloudFloorDNS to allow secondary DNS import. Importing the zones from Dyn is the best way to go, it avoids human error and talks machine to machine allowing us to pull down all the the zones at Dyn and associated DNS records. This process takes all of about 5 minutes total to import zones into your CloudFloorDNS account

Adding the CloudFloorDNS IP’s to help import DNS zones from Dynect
- Place a Freeze on any updates or changes at Dyn during the move. It’s important that you put a hold or at least keep track of any changes at Dyn after you start importing into the CloudFloorDNS platform. Once the AXFR connection is shut off (it’s only used to import) the changes won’t be replicated. If you do make any changes at Dyn once the moving/staging process is started at CloudFloorDNS, you can simply add the new records before you cutover DNS for good
- Convert your DNS Zones to Primary at CloudFloorDNS. Now that your zones are imported, you immediately want to convert the zones from Secondary to Primary. In the domain list, you simply click on the “S” icon on each domain and click “convert to primary”. This does NOT impact your live DNS still at DYN, it merely imports and you can begin the staging process to get ready to move your DNS away from Dyn. Once all your domains are converted to primary, you will see a “P” icon in the list of domains instead of “S” for secondary
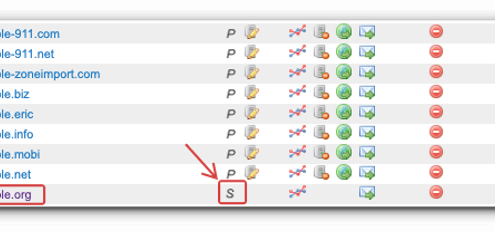
Converting the domain to Primary after importing the zone file from Dynect using Secondary DNS AXFR
- Use the Bulk tools to find and replace all the Nameserver (NS) records and SOA from Dynect and replace them with CloudFloorDNS NS and SOA. The CloudFloorDNS platform has some handy DNS tools for making bulk changes quick and easy. Simply do a Find and Replace to swap out the NS records from Dynect to the assigned nameservers at CloudFloorDNS. Also swap out the SOA hostnames on each domain. You can find your assigned nameservers and SOA server under the My Account page dashboard when you login to the CloudFloorDNS control panel
- Convert your Webhop and ALIAS records – Dyn set’s their webhop records to a set of IP’s that are specific to Dyn. You need to replace these IP’s with a REDIRECT:// record type available on the CloudFloorDNS platform that replicates the Dyn Webhop. Do this for each zone that you have Webhop setup. Convert any ALIAS records you have to the CloudFloorDNS ALIAS type. Since all Managed DNS providers perform ALIAS records differently, the import will show 0.0.0.0 on the ALIAS records in your zones. Replace them with the ALIAS record type on our platform
- Review each zone visually, checking SOA, NS to ensure they are setup and ready on the CFDNS nameservers.
Review all other records visually and also check them with dig directly at the old and new nameservers to ensure 100% accuracy. Once you have the base DNS setup and ready, you can then setup any DNS Failover, GEO DNS and other advanced services. Ask CloudFloorDNS to also review your setup to ensure 100% compatibility and accuracy before you make the move. This gives you an extra set of eyes on the zones and account setup to ensure a smooth cutover
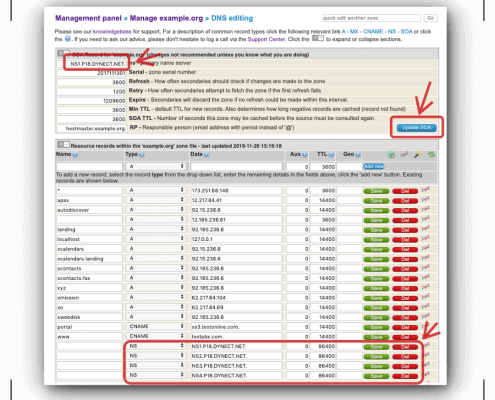
Reviewing the SOA and the Nameservers when moving DNS from Dyn to CloudFloorDNS
- Change DNS from Dynect to CFDNS nameservers at your registrar. For each zone you are moving to CloudFloorDNS, go to the registrar where the domain is registered and change the DNS from DYNECT nameservers to CloudFloorDNS nameservers. That’s it for the hard part, once you make the DNS changes CloudFloorDNS will start picking up DNS queries and resolving as cache expires from Dyn. You’ll have zero downtime and within a day or so all DNS queries will no longer be hitting Dyn and you should be 100% cutover
- Test and Check your changes using external DNS testing tools – External DNS testing tools can give you great visibility on DNS propagation around the world. These tools help you see the actual DNS changes to ensure your new DNS provider is now serving your DNS. We suggest tools like WhatsMyDNS.net, DNSChecker.Org and DNSPerf.com for their DNS propagation and testing tools.Leave your Dyn account open for at least a week or two to ensure you have everything migrated properly. If you take these steps and plan ahead, making a DNS move away from Dyn to CloudFloorDNS will be a breeze.